Colorfully renowned Canna Lily flowers are an exceptional addition to your garden in summer, but do you know about their notorious seeds, reputed for being a hard nut to crack for germination?
Besides, Canna’s seed can naturally disperse from its pod and germinate upon suitable conditions regardless of the tough seed.
Table of Contents Show
Overview of Canna Lily Seeds
Canna Lily seeds are nothing special if you see them at first, other than their round shape.
All these perennial Canna Lily seedpods in the plant mature within this time. You can expect Canna to set seeds whenever the plant produces blooms within summer.

When young, the seedpods are green with rubbery spikes on the outside, nurturing white and soft immature seeds inside.
| Seed Attributes | Properties |
|---|---|
| Shape | Round to spherical |
| Color | Dark brown to black |
| Size | 0.5 to 1 centimeter in diameter |
| Weight | About 0.2 gram |
| Seeds Per Pod | 2 to 3 |
| Harvesting Season | Early to mid-summer |
| Germination Initiator | Water |
| Germination Time | 7 to 14 days |
| Germination To Flowering Time | About 3 months |
| Treatment Prior To Germination | 1. Scarring the seed coat 2. Soaking in warm water for 24 to 48 hours |
| Germination Temperature | Between 18°C to 23°C during day Around 15°C during night |
| Seed Sowing Time | Mid to late February |
| Soil Type and pH For Seed Germination | Well-draining soil with pH between 6.5 and 7 |
| Seed Sowing Depth | 1/4th inch deep |
| Cotyledon(s) | One |
| Toxicity | Non-toxic for pets and humans |
Although the seeds look somewhat edible, the dried seeds are useless for consumption. Besides, immature and white seeds are edible after cooking.
It means the seeds carry no toxic traits, but it doesn’t mean you should gobble many.
How to Harvest Canna Lily Seeds?
When the Canna Lily seeds are ready, you can see them peeking out from the dried seedpods from early to mid-summer.
However, to produce the seeds, the flowers must be pollinated. And if your garden has pollinators like bees or hummingbirds, the process becomes easy as Canna can self-pollinate.

Following the pollination, the flowers fade within 1 or 2 days and turn brown. The small nub at the flower’s base swells into a round, oval, green seedpod that protects the immature white seeds.
Remnants of the petals crowning at the top of the pods shrivel and fall.
A few days later, the seedpod dries off and turns papery brown, and then the seeds peep out from the cracks on the pods, and the fun harvesting process begins.
But sometimes the Canna Lily turning brown could signal problems in the plant, which needs immediate treatment.
Canna Lily Seeds Collection
Collecting the Canna Lily seeds shouldn’t be a pushover, even for amateur gardeners. Seeds are ready when they spill out from the seed pods in the fall.
But not all the pods mature simultaneously, so leave the green ones.
Moreover, you can also use your hands. Simply hold your palm before the pods and pinch out the seeds with the other hand.
Watch the video to learn how to collect Canna Lily Seeds in detail.
Storing the Canna Lily Seeds
The Canna Lily seeds feel hard as a stone but are still soft against moulds, so begin storing them immediately.
To prevent them from rotting, you’ll need to dry them completely.
Here is how to store Canna Lily seeds.
- Take a window screen and lay it flat on a table.
- Separate any debris from the seeds that you have collected.
- Place the seeds on the window screen for 3 to 4 days for drying. Make sure to flip the seeds daily for even dryness.
- Place the seeds in a paper envelope, zip-lock bag, or glass jar.
- Mark the collection and storage date, then keep the bags or jars in a cool, dry area.

You can also leave the seed in the pods, which is a much better option as the papery pods act as a natural protection for the seeds.
Canna Lily Seeds for Sale
You can buy the Canna Lily seeds from the website below if you do not find them in your local nursery.
| Sites/ Shops | Delivery Period |
|---|---|
| Amazon | Within 4 to 5 days after placing an order |
| Etsy | Within 30 to 37 days after placing an order |
| Weseeds | Within 7 to 30 days after placing an order |
| Harrisseeds | Within 1 to 2 days after placing an order |
| Ebay | Within 1 to 4 days after placing an order |
How Do You Grow Canna Lily from Seeds?
Harvesting Canna Lily seeds seems easy, but the process of germination will break your sweat.
The seeds have specific requirements and won’t germinate if you don’t tickle their seed coat. But you can plant the seed in the soil right after harvest.
However, storing seeds can increase the viability, plus you can have propagating materials available for the next season.
Usually, mid to late February is the perfect month to plant the seeds.
Since the ground is still frosty at this time, start the seeds indoors and then transplant the seedlings outside.
Steps to Propagate the Seeds
Once you have collected all the requirements, it’s time to propagate!
1. Scarifying the Seeds
Prepare the seeds by scarifying and soaking them in water simultaneously.
But before this, place the seeds in 6% sodium hypochlorite solution for 10 minutes to disinfect them and wash them 4 to 5 times with distilled water later.
Now, you can scarify the seeds in boiling water but add them after turning off the heat and letting the water stay for 1-2 minutes. You need to submerge the seed for 24 to 48 hours.
Alternatively, use the side of the nail clippers to nick the outer coat of the seed to reveal the white interior. Or you may also use sandpaper to scratch the surface of the seeds.
You need not worry even if you cut or scratch more than required. Canna Lily seeds are tough for a reason and will sprout just fine.
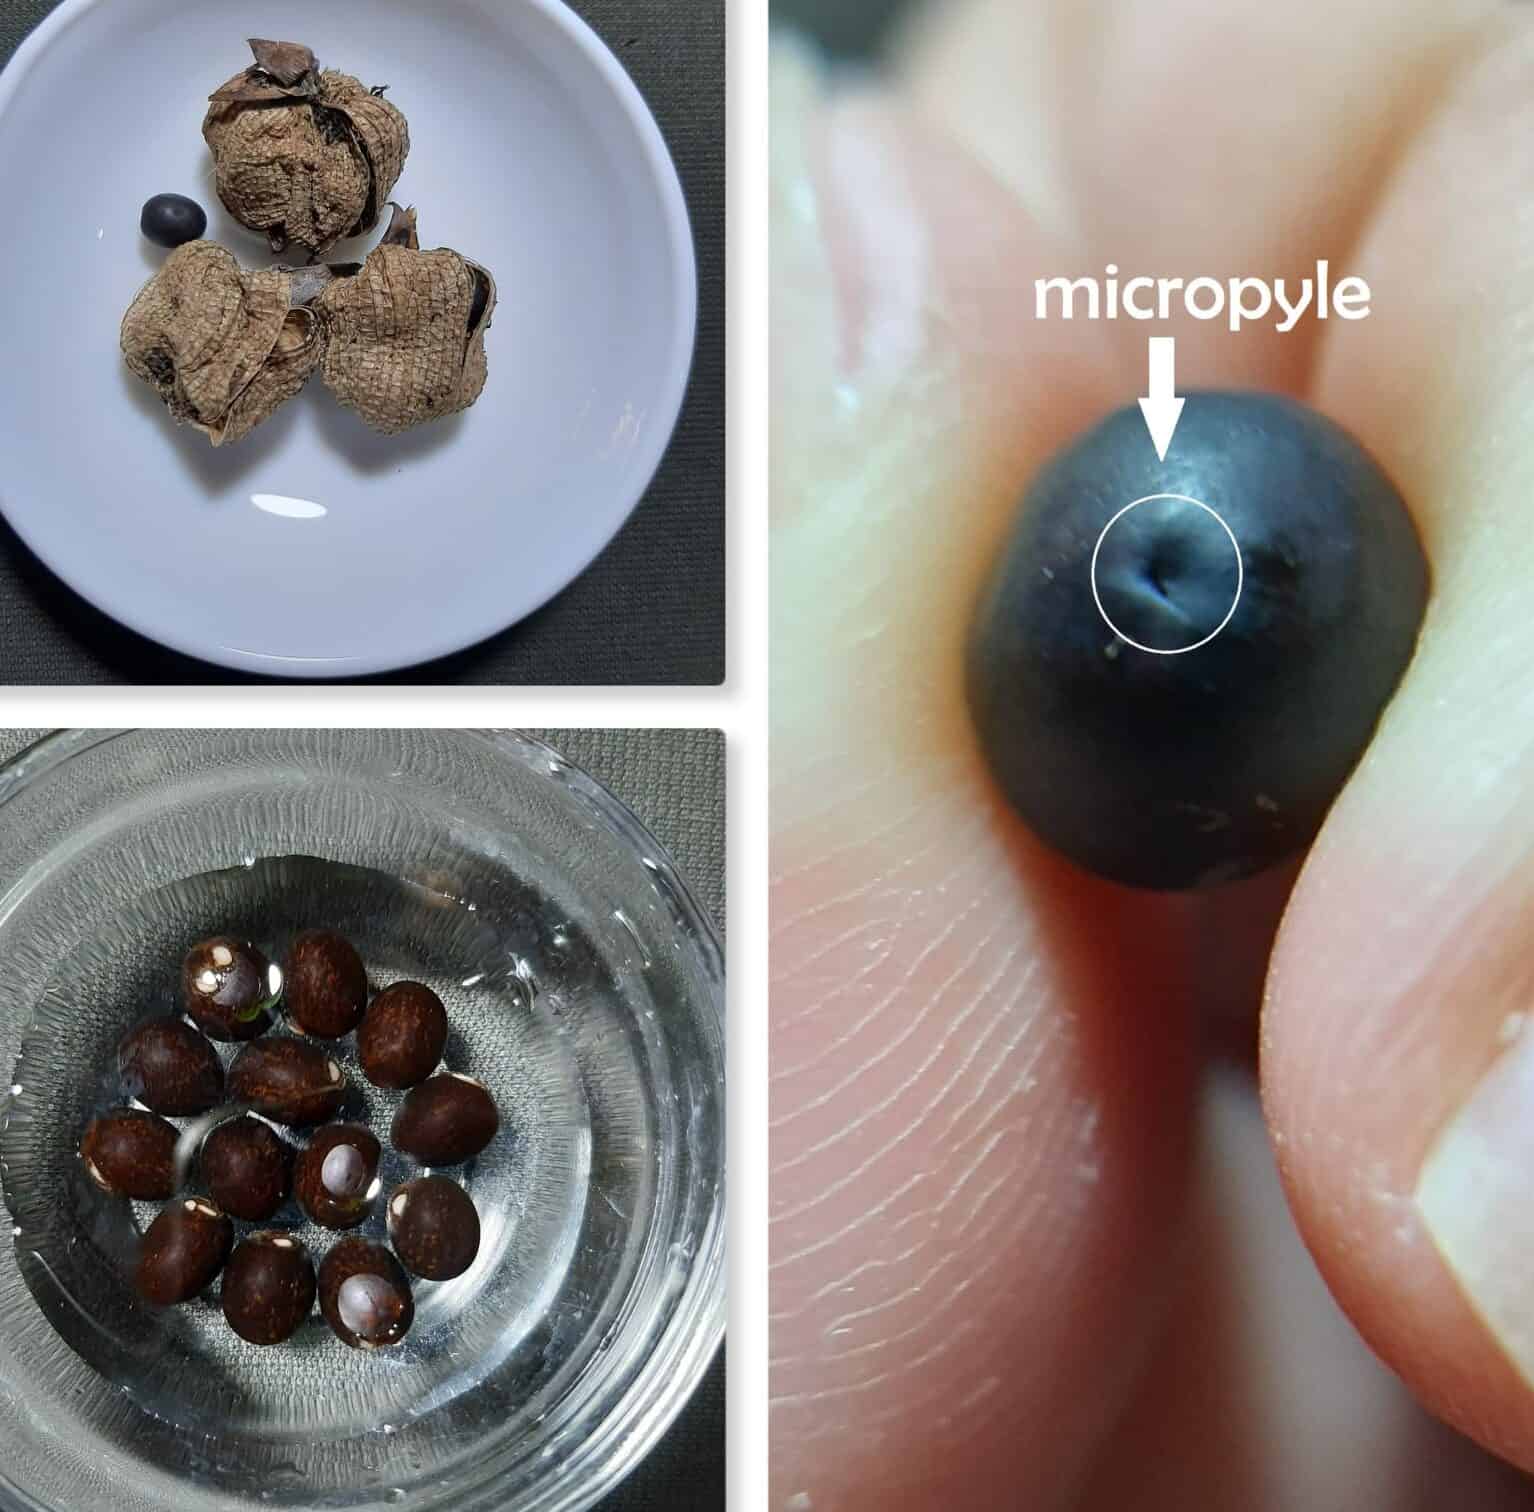
But be mindful not to scratch or nick near the micropyle region of the seed. The roots later come out from the micropyle during germination.
Step 2: Soaking in Water
Soaking the seed separately is necessary if you nick or scratch the seed coat without scarifying them in boiling water.
Moreover, soaking the seeds speeds up germination later by softening the seed coat and allowing the water to reach the embryo early.
- Take a large glass bowl and place the nicked seeds in it.
- Add distilled water and soak the seeds for 24 to 48 hours.
- You can take the seeds out for planting when you observe the white radicle sprouting.
- It is even better to wait for the roots to sprout up to 3 to 4 millimetres so the roots have a heads-start to grow in the soil later.
Step 3: Planting the Seeds
You are ready to plant your seeds once they finish germinating. Follow these steps.
- Place the seeds in biodegradable pots or a tray with seed starter mix.
- Use coconut coir and perlite or sand in a ratio of 1:1 to grow the seedlings.
- Sow one seed per pot 1/4th inch deep or keep a distance of 2 to 3 inches between seeds while planting in the tray.
- Cover lightly with the soil, and then keep the soil moist evenly.
- Place the pots or trays over a heating mat maintained around 65°C to 75°C.
- Cover the pots or trays using plastic wrap to sustain a humid environment for seedlings to grow.
- Seedlings shall sprout anywhere within 7 to 14 days, then remove the plastic film and place the tray or pots in an area that receives 6 hours of sunlight daily.
- Start giving low-nutrient fertilizer when they are 3 to 4 weeks old. And when the seedlings reach 5 to 7 inches or sprout 2 to 3 leaves, harden them.

Provide the seedlings with optimum red and blue lighting balance for 10-12 hours while growing under fluorescent lights. Give the seedlings a 12-hour dark period for the best result.
Step 4: Planting Outdoors
Take the seedlings out in the shade and accustom them to external conditions for a week.
Once the ground temperature reaches around 50°F, you can plant the seedlings in the garden soil.
- Place the seedlings 18 to 24 inches apart in the garden soil.
- If you wish to place the seedlings in larger pots outside, use at least 18 inches wide pots.
- Choose a place that receives full sun.
- Also, keep well-draining soil and add sand or perlite for extra drainage.
- Maintain the soil pH between 6.5 and 7. You may add lime to maintain acidity if the soil is basic.
- Loosen the 12 to 13 inches deep soil and mix 2 to 4 inches of compost.
- Plant the seedlings, moist the soil with water, and cover the soil surface at the root line with mulch.
Tips to Care During Propagation
- Avoid the sand particles from contaminating or damaging the seeds while using sandpaper.
- Plant the seedlings outside when the ground is warm enough to grow.

- Keep the required spacing (18 to 24 inches) between the plants so that the delicate leaves don’t rub each other when swaying along the wind currents.
- Prevent deadheading the blooms if you want Canna to set the seeds right on time.
- Disinfect the seeds and wash them afterwards. Avoid planting them directly in the soil after disinfection.
- Don’t use hot water for boiling Canna Lily seeds or to scarify the seeds. Maintain a temperature around 77°C to 100°C.
Tips to Care for Canna Lily Seedlings After Germination
- Maintain the surrounding temperature between 15°C to 32°C.
- Plant the Canna Lily in a sunny spot in your garden that receives 4 to 6 hours of direct sunlight, or move the pots in the sun for the time being.
- Provide moist and well-draining with slightly neutral to acidic soil.
- Use 20-20-20 NPK fertilizer in the growing season and 15-30-15 NPK fertilizer in the flowering season.
- Apply fertilizer in early spring, once a month, until six weeks before the first frost hits your area.
- Provide 7 liters of water per week, i.e., a liter per day, to your Canna Lily.
- Prune Canna lilies once a year when the first frost of the fall kills all the above-ground parts.
- Dig up the rhizome during winter and wait for spring to replant it.
- Canna Lily loves an arid environment, so sustain humidity levels around 30% to 40% for full growth.
Editor’s Note
Provide Proper Spacing!
These lily seeds are tough but aid a little effort to break their stubbornness by giving them a gentle scratch on their seed coats.
You must also maintain the right temperature with proper sowing depth while planting them.